Managing states with a lightweight FSM
Games will typically have a number of states and sub-states and there are endless ways in which these states can be defined from using a switch statement, to using delegates, state pattern, coroutines, scenes, animation events, etc. Each approach brings its own advantages and disadvantages and some are better suited depending on the use case.
One thing that I will say is that relying on animation events can be quite unpredictable since sometimes they do not trigger. In a client project we found that Unity’s animation system skips over animation events when there is a spike in the framerate. This was really bad because randomly it would not advance to the next stage.
Unity actually includes a state machine called Mechanim which was designed primarily to manage the states of animations although can be used as a general purpose state machine by implementing state behavior classes. Despite being a powerful system for animation it seems to lack some of the flexibility and simplicity that I require from a general purpose state machine.
The design of my general purpose state machine has evolved over past projects. Each state machine instance is started as a long running coroutine which is extremely useful when defining procedural animation and time-based events. It works very well with the DOTween tweening library that I use. Transitions can optionally be specified to manage the transition from one state to another; this is useful when adding fancy screen transitions.
Coroutine performance has gotten a lot better in recent releases of Unity. Obviously they still come at a relatively small cost but they are a useful tool and the advantages of using them for my use cases far outweigh that cost.
My lightweight fsm implementation will work in any regular .NET / Mono application since
it makes minimal usage of the Unity API. The only Unity-specific class is the
StateComponent base class which is completely ignored when used outside of the Unity
engine.
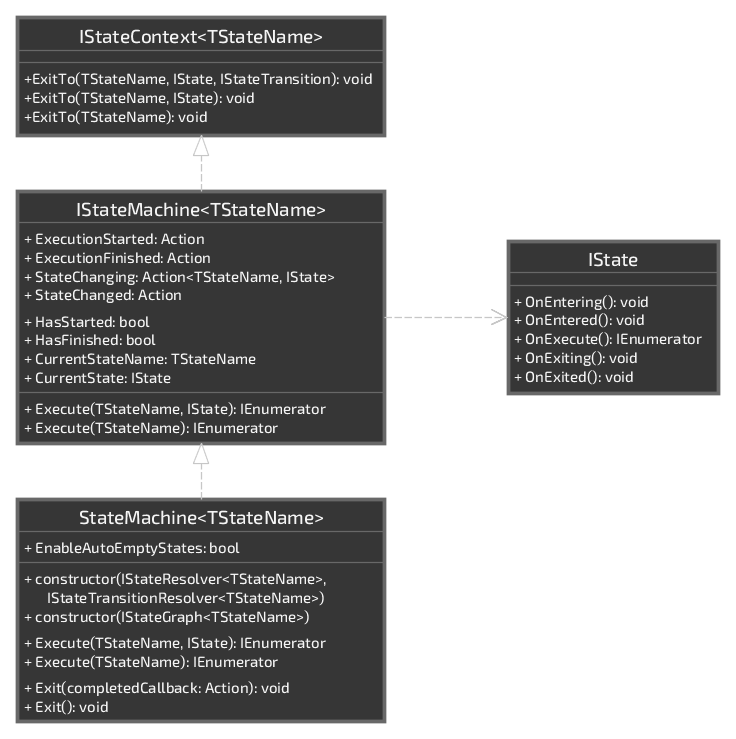
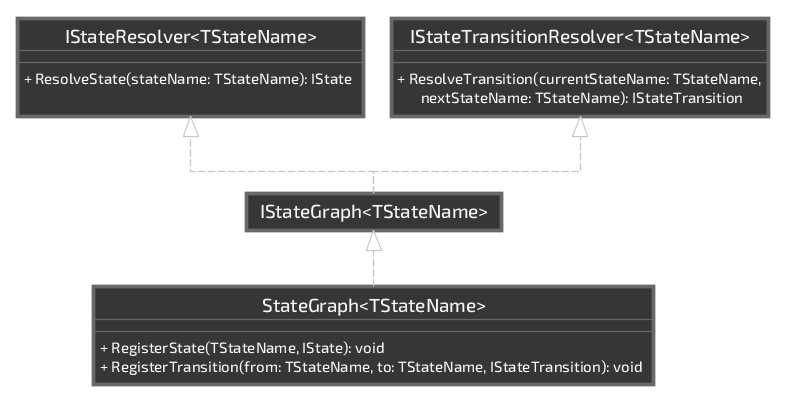
State transitions can be initiated by specifying either the target IState or the name of
the target state. For this reason it is useful to be able to resolve the IState of a
given name even allowing for more complex state resolution logic if desired. For example,
a more complex state resolver could select between multiple “TitleMenu” states based upon
whether the game has been completed or some in-app-purchase has been purchased.
Likewise it is useful to be able to resolve the transition that should be used when transitioning from one state to another. A transition is an optional object that can sequence the transition from the current state to the next. This can be useful when adding fancy transitions between screens.
My StateMachine<TStateName> class can be constructed by providing a state resolver and
a transition resolver or alternatively a state graph. A state graph is simply an object
that provides both state and transition resolution logic. A basic StateGraph<TStateName>
implementation is provided which allows states and transitions to be registered but
obviously it is possible to use an entirely custom implementation.
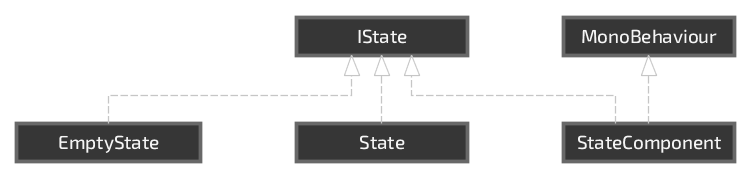
In my projects I use this state machine library in various different ways. I have two base
classes State and StateComponent which can be used to implement states as POCOs or
as components that can be attached to game objects.
I also made a reusable EmptyState sealed class which is a singleton that does nothing.
This state can be used when states have no special functionality or when blocking out new
state machines.
Each state of a IStateMachine<TStateName> is identified using a name that is defined
using an enum. This is then used as the generic type parameter when constructing a state
machine.
public enum GameStateName
{
    Intro,
    TitleMenu,
    Playing,
}
I like to expose each state to the world by providing a context object; but this is
entirely optional. A context can optionally implement the IStateContext<GameStateName>
interface which provides some useful methods to transition to the next state. Additional
transition logic can of course be added to the context where needed (such as to exit to
the desktop).
public interface IGameStateContext : IStateContext<GameStateName>
{
    void ExitGame();
}
The context object can be provided to the state in a number of ways including constructor
injection, property injection or via some sort of Initialize method. I like to put this
common logic into an abstract base class:
public abstract class GameState : State
{
    public IGameStateContext Context { get; set; }
}
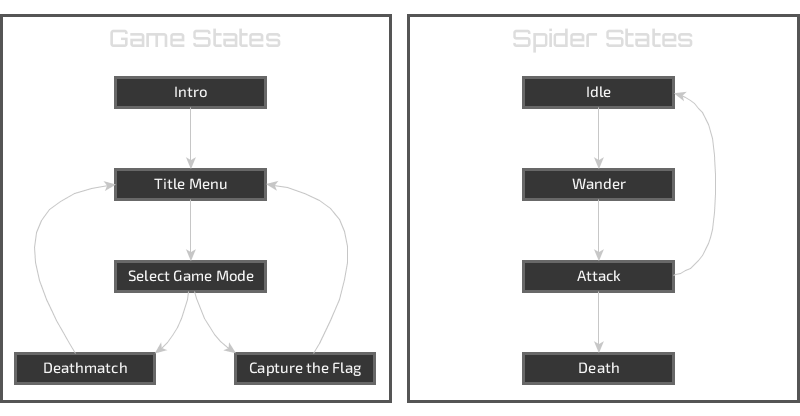
In the following example I have a GameController which is essentially just a navigation
controller that navigates the main states of the game. Each of these states can define
sub-states if they need to be broken down further. For example, depending on the type of
game the “Playing” state could be broken down into various sub-states such as “Prepare”,
“Standard” and “GameOver”.
With this particular example each game state is essentially a presenter which populates the properties and observes the events of an associated view (essentially the MVP design pattern). I use dependency injection to instantiate the object hierarchy but any object creation method can of course be used.
In this case the GameController acts as the context of its states. If preferred the
context can be encapsulated by implementing a private GameController.Context class;
although I don’t feel that the extra level of indirection adds any real value here.
public sealed class GameController : IGameStateContext
{
    private readonly StateMachine<GameStateName> stateMachine;


    // Dependencies are injected into the constructor.
    public GameController(
        IntroGameState introState,
        TitleMenuGameState titleMenuState,
        PlayingGameState playingState
    ) {
        // Assign context to each of the states.
        introState.Context = this;
        titleMenuState.Context = this;
        playingState.Context = this;

        // Associate each state name with their instances.
        var graph = new StateGraph<GameStateName>();
        graph.RegisterState(GameStateName.Intro, introState);
        graph.RegisterState(GameStateName.TitleMenu, titleMenuState);
        graph.RegisterState(GameStateName.Playing, playingState);
        this.stateMachine = new StateMachine<GameStateName>(graph);
    }


    public IEnumerator Execute()
    {
        // Execute the state machine starting with the intro state.
        return this.stateMachine.Execute(GameStateName.Intro);
    }

    public void ExitGame()
    {
        Application.Quit();
    }


    // A little boilerplate to allow states to transition between one another
    // since `IGameStateContext` implements the `IStateContext<GameStateName>`.
    void IStateContext<GameStateName>.ExitTo(GameStateName stateName, IState state, IStateTransition transition)
    {
        this.stateMachine.ExitTo(stateName, state, transition);
    }

    void IStateContext<GameStateName>.ExitTo(GameStateName stateName, IState state)
    {
        this.stateMachine.ExitTo(stateName, state);
    }

    void IStateContext<GameStateName>.ExitTo(GameStateName stateName)
    {
        this.stateMachine.ExitTo(stateName);
    }
}
Transitions can be explicitly defined on the state graph using graph.RegisterTransition
when custom transition behavior is desired. With this design it is not necessary to define
which transitions are legal on the graph since each state is responsible for selecting the
state that it would like to exit to. However, state transition validation can easily be
added to a custom state machine implementation if desired.
Here is a very basic “Intro” game state which waits for two seconds before advancing to the “TitleMenu”. The associated view is shown upon entering the state and then hidden upon exiting to the next state.
For small games I like to define a “MenuSystem” prefab that contains all of the menu
panels and huds. The root-most object has a “MenuSystem” component that implements a
IMenuSystem interface providing access to each of the views.
public sealed class IntroGameState : GameState
{
    private readonly IIntroView view;


    public IntroGameState(
        IMenuSystem menuSystem
    ) {
        this.view = menuSystem.IntroView;
    }


    public override void OnEntering()
    {
        // Show view upon entering state.
        this.view.Show();
    }

    public override IEnumerator OnExecute()
    {
        // Wait for a couple of seconds and then exit to the title menu.
        yield return new WaitForSeconds(2f);
        this.ExitTo(GameStateName.TitleMenu);
    }

    public override void OnExiting()
    {
        // Hide view upon exiting state.
        this.view.Hide();
    }
}
In the following situation the game state subscribes to a couple of actions from its view’s interface so that it can start a new game or exit to the desktop. It is useful to subscribe to these events when entering the state and then to unsubscribe again when exiting the state so that events are only handled whilst the state is active.
public sealed class TitleMenuGameState : GameState
{
    private readonly ITitleMenuView view;
    private readonly IPlayerProfile playerProfile;


    public TitleMenuGameState(
        IMenuSystem menuSystem,
        IPlayerProfile playerProfile
    ) {
        this.view = menuSystem.TitleMenuView;
        this.playerProfile = playerProfile;
    }


    public override void OnEntering()
    {
        // Initialize view from player profile.
        this.view.BestScore = this.playerProfile.BestScore;
        this.view.PreviousScore = this.playerProfile.PreviousScore;

        // Subscribe to the view's input events.
        this.view.PlayGameAction += this.View_PlayGameAction;
        this.view.ExitGameAction += this.View_ExitGameAction;

        // Show the title menu view.
        this.view.Show();
    }

    public override void OnExiting()
    {
        // Be sure to unsubscribe from the view's events again:
        // - Ignore further input (i.e. button click during hide animation).
        // - The view might be reused.
        this.view.PlayGameAction -= this.View_PlayGameAction;
        this.view.ExitGameAction -= this.View_ExitGameAction;

        // Hide the title menu view again.
        this.view.Hide();
    }


    private void View_PlayGameAction()
    {
        // Exit to the playing state when the view indicates that the player
        // would like to play a new game; for instance, by clicking the
        // "Play Game" button.
        this.Context.ExitTo(GameStateName.Playing);
    }

    private void View_ExitGameAction()
    {
        // Exit the game when the view indicates that the player would like
        // to; for instance, by clicking the "Exit Game" button or by pressing
        // the escape key.
        this.Context.ExitGame();
    }
}
In the above examples I demonstrated how I use a state machine to manage high level game states; but the same mechanism can also be used to manage states elsewhere such as for an actor.
In the following example the spider actor has four states that are implemented as components so that they can be attached to the actor game object (or on nested game objects). The states are then wired up using the inspector. This is a powerful mechanism because it allows for a “SuperEvilSpider” prefab to be created that has, for example, an alternative extra mean “Attack” state.
public sealed class SpiderActor : MonoBehaviour, ISpiderStateContext
{
    [SerializeField]
    private SpiderState idleState = null;
    [SerializeField]
    private SpiderState wanderState = null;
    [SerializeField]
    private SpiderState attackState = null;
    [SerializeField]
    private SpiderState deathState = null;


    private StateMachine<SpiderStateName> stateMachine;


    private void Awake()
    {
        this.InitializeStates();
        this.ExecuteStateMachine();
    }

    private void InitializeStates()
    {
        // Assert that components were specified for each of the states.
        Assert.IsNotNull(this.idleState);
        Assert.IsNotNull(this.wanderState);
        Assert.IsNotNull(this.attackState);
        Assert.IsNotNull(this.deathState);

        var graph = new StateGraph<SpiderStateName>();
        graph.RegisterState(SpiderStateName.Idle, this.idleState);
        graph.RegisterState(SpiderStateName.Wander, this.wanderState);
        graph.RegisterState(SpiderStateName.Attack, this.attackState);
        graph.RegisterState(SpiderStateName.Death, this.deathState);
        this.stateMachine = new StateMachine<SpiderStateName>(graph);

        this.idleState.Initialize(this);
        this.wanderState.Initialize(this);
        this.attackState.Initialize(this);
        this.deathState.Initialize(this);
    }

    private void ExecuteStateMachine()
    {
        this.StartCoroutine(this.stateMachine.Execute(SpiderStateName.Idle));
    }


    //!TODO: Implement something interesting!
}
For this example I chose to use an Initialize method to initialize the actor with its
context and allowing it to perform additional initialization logic using that context.
public abstract class SpiderState : StateComponent
{
    public ISpiderStateContext Context { get; private set; }


    public void Initialize(ISpiderStateContext context)
    {
        Assert.IsNull(this.Context);
        this.Context = context;
        this.OnInitialize();
    }


    protected virtual void OnInitialize()
    {
    }
}
Each spider state is then just an implementation of SpiderState:
public sealed class SpiderState_Attack : SpiderState
{
    //!TODO: Implement something interesting!
}

public sealed class SpiderState_ExtraMeanAttack : SpiderState
{
    //!TODO: Implement something interesting!
}