Services and configuration assets for Unity projects
With many of the projects that I have worked on it has been necessary to support a variety
of build targets that are either configured differently or make use of entirely different
services. In early projects I would simply use the various symbols that Unity defines such
as UNITY_ANDROID but this falls short when supporting multiple Android based platforms.
Not to mention dealing with projects that contain multiple reskins of the same core game
each with a range of different platforms.
Over the course of several projects my approached evolved into having a dedicated configuration asset per build target. For game projects that are home to multiple reskins this means having a set of configuration assets per reskin. Since I use Zenject to perform dependency injection it is fairly straightforward to inject entirely different implementations based purely upon configuration.
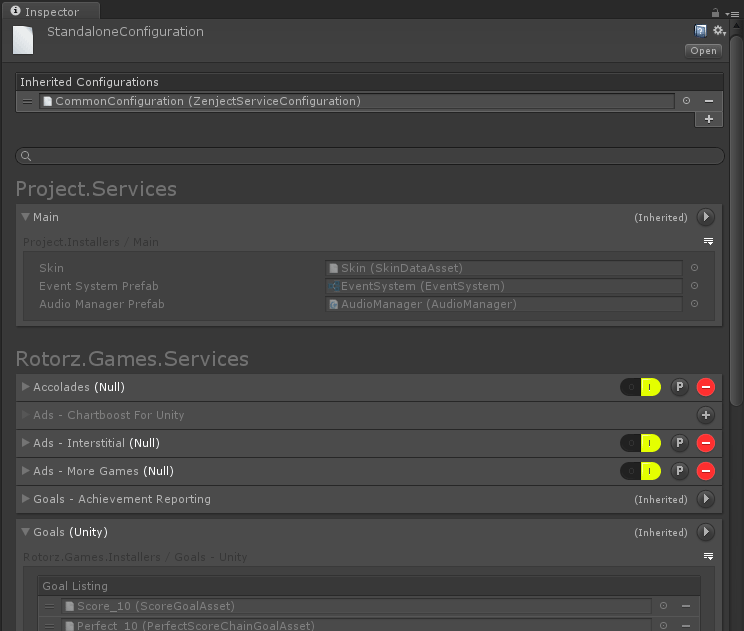
Here is an example of a configuration asset which in this particular case is inheriting some configuration that is common to all targets of the game:
Each service is essentially just a contract that is declared and uniquely identified using .NET’s type system. For instance, the “Goals” service could be declared as follows:
public sealed class Goals_Service : Service
{
}
The “Goals” service will then automatically appear in the configuration asset inspector as something that could potentially be configured and installed. In order to install some implementation of the “Goals” service at least one dedicated installer will need to be implemented.
A ZenjectServiceInstaller<TService> is essentially just a ScriptableObjectInstaller
from the Zenject dependency injection framework. Whilst I choose to use Zenject for
dependency injection in my projects; this same technique could easily be used with other
dependency injection frameworks.
public abstract class Goals_Installer : ZenjectServiceInstaller<Goals_Service>
{
    public override void InstallBindings()
    {
        this.Container.Bind<IGoalManager>()
            .To<GoalManager>()
            .AsSingle();
    }
}
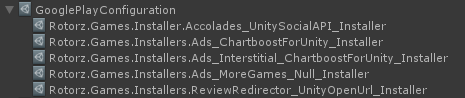
If only one installer is available then simply clicking the (+) button to the side of the service in the configuration asset inspector will add the installer component to the configuration asset. If multiple installer implementations are available then they will be displayed in a drop-down menu allowing the user to select which specialized installer should be used to install that service.

This is especially useful for situations where there might be platform specific implementations of a service; such as how achievements are reported. You might want to configure and install a “Steamworks” implementation for standalone desktop releases whilst using Unity’s “Social API” implementation for mobile releases; or even utilize some sort of fake implementation for platforms that do not have any specialized support for reporting achievements.
A fake implementation could be anything from providing a “Null” implementation that simply does nothing when achievements are reported to a custom achievements solution which shows a custom in-game UI.
Each completed configuration asset represents a build target of the Unity project; so effectively one for each build target. It is also possible to have different configurations for multiple platforms that use the same technology; such as Android for the Google Play and WildTangent stores. Common configuration can also be inherited from shared configuration assets if desired.
The “TargetConfigurationSelector” asset simply marks the active build target. In my projects I simply have uTomate wire this up automatically upon initiating a build.
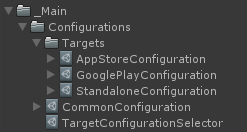
Configurations and installers are assets that extend Unity’s ScriptableObject asset
allowing the installers to be added as sub-objects of configuration assets:
Whilst the installers can be configured using the inspector by selecting the configuration sub-objects; this is usually not necessary since they are inlined into the inspector of the configuration asset.
I devised a simple naming convention that can optionally be used when implementing services and installers. In addition helping to keep the classes organized this trait is used by the configuration and installer asset inspectors to provide a clean and readable UI for the person that is wiring up the configurations.
For example, if there were multiple options for installing an achievement reporting service and a specialized “Steamworks” service is installed then the configuration asset inspector would read “Accolades Service (Steamworks)”.
Each target configuration can then specify its own platform-specific properties such as leaderboard and achievement identifiers:

The user can open up the installer source file by selecting from the installer component’s
context menu in exactly the same way that they would if they wanted to view the source of
a MonoBehaviour derived class.
Services can be defined in source files that are included somewhere within a Unity project or in compiled assemblies if desired. In my projects services are primarily defined within packages. Often there is an abstract package that defines the service along with the minimal required interfaces that must be implemented in order to use the service.
A separate package is then created for each specialized implementation of the service; for instance “accolades” would define the service and interfaces whilst “accolades_steamworks” would provide a steamworks specific implementation and installer.
For small games I found that it was only necessary to have a single “Main” service per game project to install all of the games services and wire up things like the menu system.
[Dependency(typeof(Goals_Service))]
public sealed class Main_Service : Service
{
}
Notice how the Main_Service has a Dependency attribute. The dependency attribute
specifies the services that are required (in this case) by Main_Service and as such must
be installed first. The dependency attribute can be used on services and/or installers and
are used internally to build a graph of services and their dependencies. This graph is not
necessarily the same as the package dependency graph.
It is useful to use the Dependency attribute on services where it is always necessary
for the other service(s) to be present (for example, a service that reports achievements
based on goal progression would always require the “accolades” and “goals” services).
It is useful to use the Dependency attribute on installers when the service dependency
is only required for a specific service implementation. In my use cases this situation has
been far less common.
Here is how an installer for the Main_Service might look:
public sealed class Main_Installer : ZenjectServiceInstaller<Main_Service>
{
    [SerializeField]
    private SkinDataAsset skin = null;

    [SerializeField]
    private EventSystem eventSystemPrefab = null;
    [SerializeField]
    private AudioManager audioManagerPrefab = null;


    public override void InstallBindings()
    {
        this.InstallGeneralPrefabPool();
        this.InstallGameManager();
        this.InstallDataServices();
        this.InstallLeaderboardReporter();
        this.InstallAudioManager();
        this.InstallPlayableActors();
        this.InstallEventSystem();
        this.InstallMenuSystem();
    }

    private void InstallGeneralPrefabPool()
    {
        var poolContainerGO = new GameObject("GeneralPrefabPool");
        var poolContainer = poolContainerGO.transform;

        DontDestroyOnLoad(poolContainerGO);

        this.Container.Bind<IGeneralPrefabPool>()
            .FromInstance(new GeneralPrefabPool(poolContainer));
    }

    private void InstallGameManager()
    {
        this.Container.Bind<ISkin>()
            .FromInstance(this.skin);

        this.Container.Bind<IOutfitPrefabProvider>()
            .To<PlayerProfileOutfitPrefabProvider>()
            .AsSingle();

        this.Container.Bind<TitleMenuScreen>()
            .AsTransient();
        this.Container.Bind<PlayingScreen>()
            .AsTransient();
        this.Container.Bind<OutfitSelectorScreen>()
            .AsTransient();

        this.Container.Bind<StandardPlayState>()
            .AsTransient();
        this.Container.Bind<GameOverPlayState>()
            .AsTransient();
        this.Container.Bind<TutorialPlayState>()
            .AsTransient();

        this.Container.Bind<GameManager>()
            .AsSingle();
    }

    private void InstallDataServices()
    {
        this.Container.Bind<IPlayerProfile>()
            .To<StandardPlayerProfile>()
            .AsSingle()
            .WithArguments(new StandardPlayerProfile.Options {
                MaxRecentScoreCount = 10
            });
    }

    private void InstallLeaderboardReporter()
    {
        this.Container.Bind<PlayerProfileLeaderboardReporter>()
            .AsSingle();
        this.Container.Bind<LeaderboardScoreReporterFailureRecovery>()
            .AsSingle();
    }

    private void InstallAudioManager()
    {
        this.Container.Bind<IAudioManager>()
            .FromPrefab(this.audioManagerPrefab)
            .AsSingle();
    }

    private void InstallPlayableActors()
    {
        this.Container.Bind<IPlayableActorManager>()
            .To<PlayableActorManager>()
            .AsSingle();
    }

    private void InstallEventSystem()
    {
        this.Container.Bind<EventSystem>()
            .FromPrefab(this.eventSystemPrefab)
            .AsSingle()
            .NonLazy();
    }

    private void InstallMenuSystem()
    {
        this.Container.Bind<IMenuSystem>()
            .FromPrefab(this.skin.MenuSystemPrefab)
            .AsSingle();
    }
}
With this approach it is very easy to define multiple skins of the same game project simply by creating a set of configuration assets for each skin. Unity’s build process will only include assets that are directly referenced by each build and so assets from, say, the “Space” skin will not be included when building, say, the “Candy” skin.
The “Skin” field references a data asset that defines all of the prefabs and rules that are used for that ‘reskin’ of the game. For example; a “Space” reskin of the game might have a menu system that is stylized with stars and planets whilst the “Candy” reskin of the game might have a menu system that is stylized with iced buns and chocolate buttons.
The actual dependency injection process can be initiated in a number of ways. In my projects I have a scene composition root in an empty scene which uses the “TargetConfigurationSelector” asset to access and install the active target configuration:

I then have some sort of a “Bootstrap” object which will start automatically after Zenject has injected the scene. I tend to just start the game manager as a coroutine since I tend to implement this as a state machine:
public sealed class Bootstrap : MonoBehaviour
{
    [Inject]
    private GameManager gameManager = null;


    private void Start()
    {
        this.StartCoroutine(this.gameManager.Execute());
    }
}