Pixel perfection in 2D game projects
Pixel perfection can be a little more complicated to achieve when using a 3D game engine than one might initially think. There are many small contributing factors to unwanted side effects such as edge bleeding, fuzziness, flickering edges, non-uniformly shaped pixels, inconsistently shaped pixels, etc. To make things harder the solutions and workarounds often vary on a case by case basis.
Before I go into this topic I just wanted to note that a lot of these things come down to the style and design choices of your games. There aren’t really any right or wrong styles but depending upon what you are aiming for you may find some of these things to be issues. This post reflects some of the lessons that I’ve learnt from working with pixel art and I hope that they will be useful to others!
Contents
Pixel art vs Retro-pixel art
First off I wanted to start this post by defining what I mean when I refer to pixel art and retro-pixel art since these are two very different art styles that typically need to be treated differently; although some of the techniques that I write about in this post apply nicely to both.
![]()
-
Pixel art is often shown at different scales be this simply to fill larger resolutions or because sprites are scaled during play. With this art style it is often desirable to take advantage of texture filtering (for instance, bilinear interpolation) so that the art doesn’t break down to look pixely.
-
Retro-pixel art has that amazing old school look and feel where source pixels are magnified without any filtering (aka point filtering). Whilst normally provided in raster form as pre-drawn artwork, it is also worth noting that things like render textures and image processing effects can be employed to make 3D models and high-res vector-like artwork appear as though it’s retro-pixel.
Some of the challenges
There are a lot of factors that contribute to imperfections when it comes to pixel art and retro-pixel art. Some of the factors are more obscure than others especially when you are new to creating 2D games using a 3D rendering engine. In this section I’ll provide an overview of some of these issues and list some of the factors that leads to them.
Fuzzy pixels
One of the first issues that you may encounter when trying to get the retro-pixel look is unpleasantly blurred pixels:
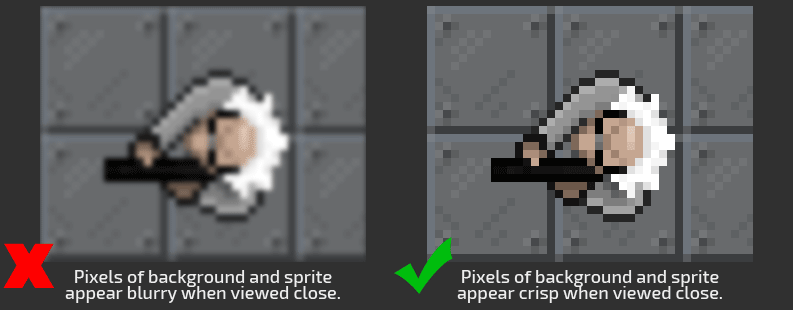
There are a few things that can lead to blurry pixels:
-
Texture filtering is being used to smoothly interpolate the pixel art. Typically this can be disabled by using “Point” filtering.
-
Mip-maps are being generated for the pixel art. Since mip-maps are generated by scaling the texture they will usually appear blurry. There isn’t usually much reason to have mip-maps enabled for retro pixel art games.
-
Lossy image compression can also lead to blurry pixels.
-
The artwork is not packed into a Power-Of-Two (POT) atlas texture. In Unity this can often be fixed using the built-in sprite packer feature or by using a third-party tool such as TexturePacker.
-
Where artwork is positioned in world space between pixels (i.e. sub-pixel alignment).
Edge bleeding and flickering edges
This problem is often quite subtle with retro-pixel art since the issue is only visible when the camera or sprites are in very specific positions which vary with the game’s output resolution. Edges will appear and disappear as the player moves around the game’s world creating an odd flickering effect.
With pixel art the problem is a little more obvious since although the random flicker will still occur, you will often notice unusual tinting and blurring around the edges of tileable images that are packed into texture atlases.
This issue occurs because the edge pixels of adjacently packed images are interpolated. This can occur due to any of the factors listed in the Fuzzy pixels section above.
The problem can be remedied by padding each packed sprite with either a border of transparent pixels (in the case of non-tileable artwork) or by extruding edge pixels (clamping) or by duplicating pixels from the opposite side of the tile (wrapping). Clamping is probably the easiest option since texture packing tools usually provide this as an option.
With retro-pixel art you can actually get away without padding tileable artwork if you have pixel perfect placement of both the camera and the drawn sprites. Although padding the artwork is still a good easy option.
Irregular shaped pixels
If you take a screenshot of your game and zoom in you may find that the widths and heights of pixels are irregular on some rows and columns of the image. This is a visual artifact that I find particularly ugly in retro-pixel art games:
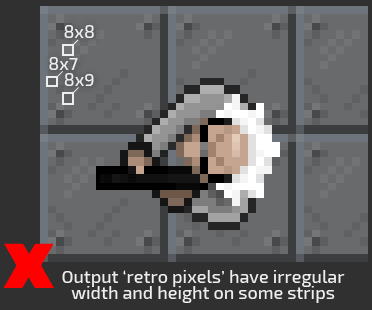
There are a few things that can lead to this problem:
-
The size of the viewport is not divisible by the number of pixels that you are attempting to squash into it. The render engine is forced to squash or stretch some of the pixels so that they fit. This problem can be remedied by padding the edge of the display with extra blank pixels.
-
The camera and/or artwork position is not pixel perfect. This can be remedied by using pixel perfect camera alignment and if needed by using pixel snapping on the rendered artwork.
Retro pixels with consistent dimensions
When working with retro-pixel art it is a good idea to ensure that all sprites and artwork are shown at a consistent scale so that their retro-pixel sizes are consistent.
If dynamic scaling is desirable then the issue can also be avoided by sticking to scales that are powers of two. For instance, a sprite that is scaled by 4 will snap nicely into the grid of unscaled sprites.
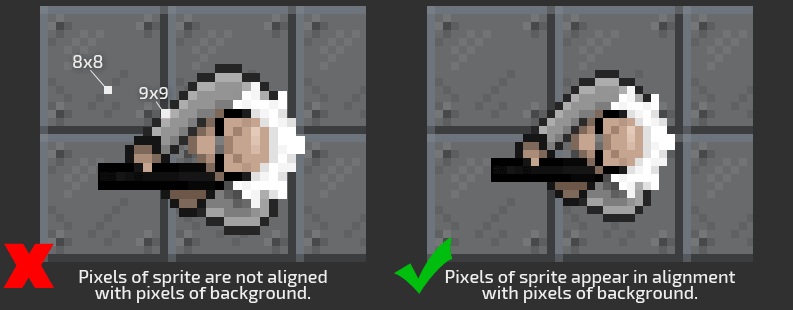
Sub-pixel placement and pixel snapping
This is basically the same as the previous issue since sprites are positioned such that their pixels are not aligned with the game’s other artwork. This issue can be remedied by snapping the physical positions of the artwork or by snapping the rendered positions of sprites such that they align nicely with all other artwork.
![]()
Rotating sprites
This one is purely a matter of taste depending upon whether you feel “rotated pixels” fit the style of your game.
![]()
There are a few ways to remedy this:
-
Provide sprite artwork with multiple drawn rotations and pick the variation that is the closest match with the actors actual rotation.
-
Render the game at a lower resolution and then upscale with point filtering. This can be achieved with a render texture and works nicely with higher resolution vector-like sprites.
Tools to tackle these challenges
Pixel perfect camera - basics
One of the most effective ways to combat the various issues mentioned above is to use a pixel perfect camera script. This helps to avoid edge bleeding, flickering edges and irregular shaped pixels.
Orthographic projection tends to be used when working with 2D graphics since perspective
usually isn’t desirable plus we can control the number of visible pixels that occupy the
screen. In Unity the number of visible pixels is controlled by specifying a value for the
camera’s orthographicSize property. If this property is set to a value of 240 then the
camera’s viewport will cover a vertical span of 480 units in world space.
By default Unity assigns a value of 100 to the ‘Pixels Per Unit’ property of sprites although I personally prefer to have 1 pixel to 1 unit of world space. The only thing that really matters is that you incorporate the same ratio into your pixel camera script.
The most integral calculation for a pixel camera script is the calculation of the camera’s orthographic size:
camera.orthographicSize = viewportHeight / (2f * viewportPixelsPerUnit);
Pixel perfect camera - controlling viewport coverage
Next up we have the problem of controlling how much of the game world is visible through the viewport; and how that content is scaled and cropped to fit any resolution:
-
Standard - Do not adjust zoom amount of the pixel camera. This essentially means that we just use the
pixelsPerUnitvalue as-is when calculating the camera’s orthographic size.Note - Pixel sizes are consistent across the entire viewport.
float viewportPixelsPerUnit = pixelsPerUnit;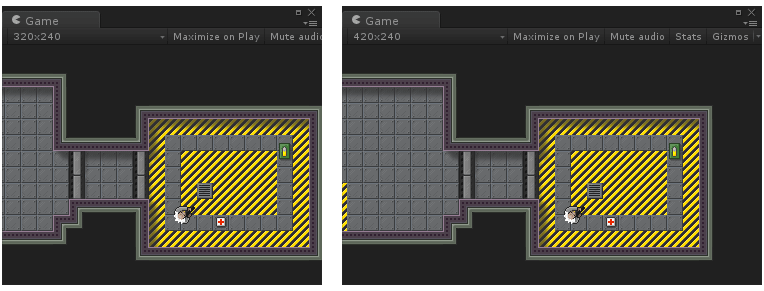
-
Fit Inside - Zoom of pixel camera is adjusted so that the target resolution fits inside the viewport as closely as possible without cropping. Cropping will still occur if the camera cannot zoom out to match the target resolution.
Note - Pixel sizes are consistent across the entire viewport.
float hCoverage = viewportWidth / targetViewportWidth;
float vCoverage = viewportHeight / targetViewportHeight;
float targetZoomAmount = Mathf.Floor(Mathf.Min(hCoverage, vCoverage));
float viewportPixelsPerUnit = pixelsPerUnit * Mathf.Max(1, targetZoomAmount);
-
Crop - Zooms to accommodate the target resolution as closely as possible without revealing any extra pixels of the game’s world.
Note - Pixel sizes are consistent across the entire viewport.
float hCoverage = viewportWidth / targetViewportWidth;
float vCoverage = viewportHeight / targetViewportHeight;
float targetZoomAmount = Mathf.Ceil(Mathf.Max(hCoverage, vCoverage));
float viewportPixelsPerUnit = pixelsPerUnit * Mathf.Max(1, targetZoomAmount);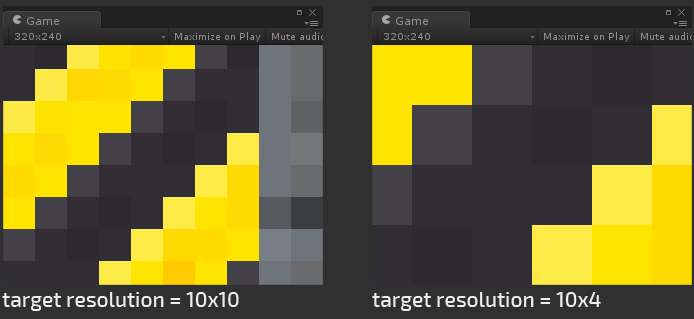
-
Crop and Squash - Stretches or squashes viewport so that the longest side of the viewport fits the target resolution and then crops the shortest side of the viewport.
Note - Pixel thicknesses may be irregular for some resolutions.
float hCoverage = viewportWidth / targetViewportWidth;
float vCoverage = viewportHeight / targetViewportHeight;
float viewportPixelsPerUnit = pixelsPerUnit * Mathf.Max(hCoverage, vCoverage);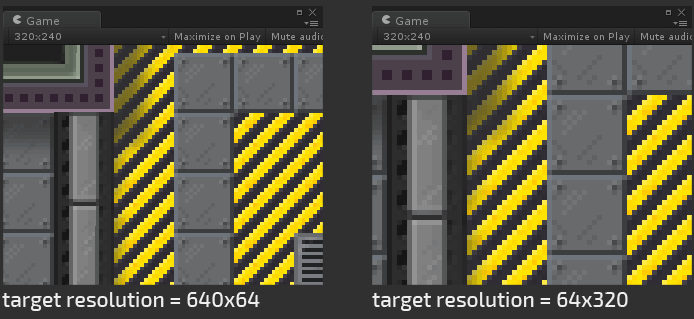
-
Fixed Height - Stretches or squashes viewport vertically so that a fixed number of pixels are shown.
Note - Pixel thicknesses may be irregular for some resolutions.
viewportHeight = targetViewportHeight;
-
Fixed Width - Stretches or squashes viewport horizontally so that a fixed number of pixels are shown.
Note - Pixel thicknesses may be irregular for some resolutions.
viewportHeight = targetViewportWidth / viewportWidth * viewportHeight;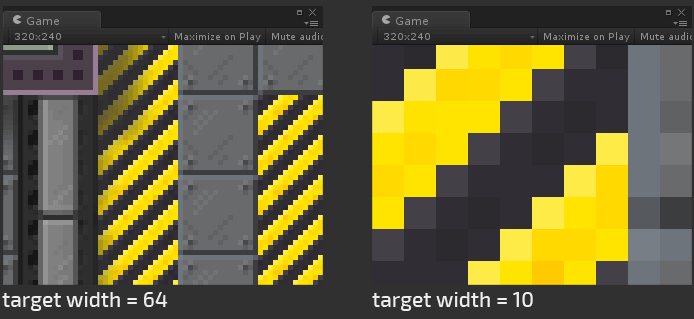
Pixel perfect camera - zoom factor
If desired an arbitary zoom amount can be factored in by multiplying the value of
viewportPixelsPerUnit from above:
viewportPixelsPerUnit *= zoomAmount;
Pixel perfect camera - dealing with uneven resolutions
This works well for common screen resolutions although if you create a build of your game that has a resizable window or for a target platform that has an odd screen resolution (not evenly divisible by 2) then you will find that all of the problems the pixel camera was striving to solve suddenly all come back.
Fortunately there is a fairly easy workaround to this problem! Simply padding the border of the viewport with blank pixels allows you to maintain an even viewport size regardless of the actual screen resolution:
Rect pixelRect = new Rect();
pixelRect.width = Screen.width;
pixelRect.height = Screen.height;

// Pad uneven viewport size with blank row/column of pixels to make size even.
if ((int)pixelRect.width % 2 == 1) {
    --pixelRect.width;
}
if ((int)pixelRect.height % 2 == 1) {
    --pixelRect.height;
}

camera.pixelRect = pixelRect;
Pixel snapping with a script
Objects can be aligned to the game’s pixel grid by rounding it so that it snaps into place. This calculation only needs to be performed the one time for static objects although for dynamic objects can be re-calculated with each movement.
It is useful to snap the position of the camera to display pixels (these are potentially smaller than retro-pixels for retro-pixel art since each retro-pixel is formed of many physical display pixels).
public Vector3 AlignWorldPointToPixel(Vector3 position)
{
    float ppu = this.PixelsPerUnit;
    position.x = Mathf.Round(ppu * position.x) / ppu;
    position.y = Mathf.Round(ppu * position.y) / ppu;
    return position;
}
An object’s position can then be snapped with a script like this:
private void Update()
{
    this.SnapNow();

    if (!this.EveryFrame && Application.isPlaying) {
        this.enabled = false;
    }
}

protected Vector3 SnapPosition(Vector3 position)
{
    var pixelCamera = PixelCamera.MainInstance;
    return pixelCamera.AlignWorldPointToPixel(position);
}

public void SnapNow()
{
    Vector3 newPosition = this.SnapPosition(this.transform.position);
    if (newPosition != this.transform.position) {
        this.transform.position = newPosition;
    }
}
If the pivot point of your sprite isn’t located in one of the sprite’s corners then you will want to counter by offsetting the pivot before and after snapping the sprite’s position in world space:
private static Vector2 CalculateSpritePivotCorrectionOffset(Sprite sprite, float ppu)
{
    Vector2 spritePixelPivot = sprite.bounds.min;
    spritePixelPivot.x = Mathf.Abs(spritePixelPivot.x);
    spritePixelPivot.y = Mathf.Abs(spritePixelPivot.y);

    Vector2 offset;
    offset.x = spritePixelPivot.x - Mathf.Round(spritePixelPivot.x) * ppu;
    offset.y = spritePixelPivot.y - Mathf.Round(spritePixelPivot.y) * ppu;
    return offset;
}

protected Vector3 SnapPosition(Vector3 position)
{
    Vector3 offset = Vector3.zero;

    var pixelCamera = PixelCamera.MainInstance;
    float ppu = pixelCamera.PixelsPerUnit;

    // Correct offset of the current position by snapping pivot of sprite?
    if (this.SnapSpritePivot && this.spriteRenderer != null) {
        var sprite = this.spriteRenderer.sprite;
        if (sprite != null) {
            offset = this.CalculateSpritePivotCorrectionOffset(sprite, ppu);
        }
    }

    return pixelCamera.AlignWorldPointToPixel(position - offset) + offset;
}
When applied naively to dynamic objects you will probably notice that the movement velocity of the dynamic object is affected in an undesirable way. There are two ways to workaround this so that the motion of the object is tweened correctly and maintains the intended sub-pixel motion:
-
Store and maintain the physical position of the object in a separate variable so that the object’s visual transform can be snapped without affecting the object’s logical position.
-
Perform pixel snapping right at the end of each frame (before the frame is drawn) and then revert that calculation at the start of the next frame. Once setup this approach is a little more convenient but obviously a little more involved.
Pixel snapping with a shader
Another option is to perform this pixel snapping on the GPU by using a shader that has pixel snapping support. Unity’s built-in shader has a “Pixel Snap” toggle which causes the sprite to be aligned with screen pixels which is a quick way to remedy a lot of the issues that I described at the start of this post.
Of course you might want to create a custom shader that calculates the pixel snapping in a slightly different way. I would suggest using one of the Unity shaders as a starting point and then tweaking since aligning with screen pixels is often useful. For example, this can help to fix edge bleeding on retro-pixel art although often multiple solutions have to be applied to completely fix edge bleeding since there are many contributing factors to that.
Using a render texture to upscale with point filtering
An effective tool when working with retro-pixel art is to assign a render texture of a lower resolution to your camera using point filtering so that the camera output is converted from pixel art to retro-pixel art. In the following illustration I put a 3D sphere primitive into the scene which appears pixely in the game view:
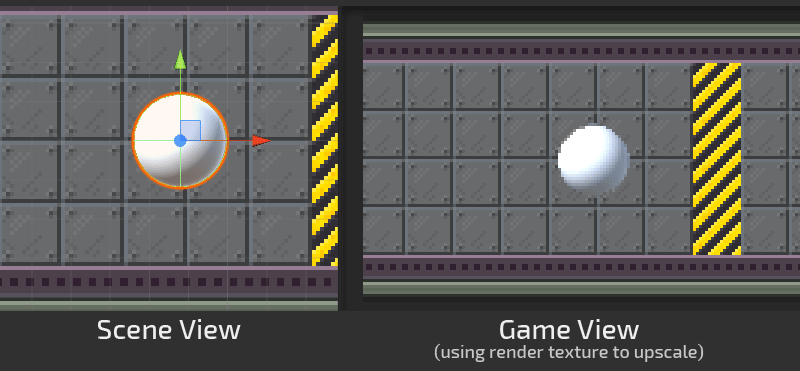
With this technique you can make vector-like artwork appear as though it’s drawn using old-skewl retro-pixels. This works particularly well for artwork that doesn’t have too much face detail.
Since all of the game’s output is rendered to a lower resolution and then upscaled this ensures that all pixels are perfectly aligned. Although it is still useful to ensure that the camera and object positions are pixel aligned since otherwise you may notice artifacts where fine details appear and vanish with movement. This happens since such detail is temporarily lost because it’s somewhere between the two adjacent output pixels as shown in the following animated GIF with a circle that has a fine red line down the middle:
There is a lot of freedom in terms of how you want to use render textures. For instance you might decide that you only want the main game area to be drawn as retro-pixels so that the game’s UI can be drawn at a higher smoother resolution.
Summary
In this post I’ve looked at a number of issues that can rear their ugly heads when working with 2D artwork and have listed some of the causes and some of the ways that they can be remedied. This is by no means a complete list and I welcome readers to comment with issues and remedies that they have encountered!